Posts tagged ‘fruit’

April 22, 2011

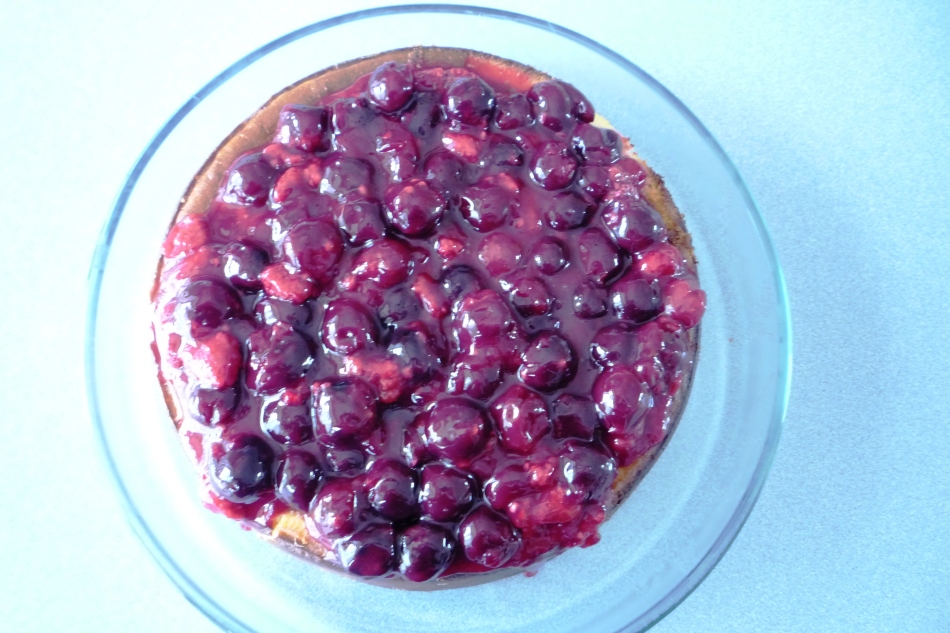
New York Cheesecake with Cherry-Raspberry Topping

New York Style Cheesecake

Don’t let the bad photography skills fool you. This cake is truly amazing. Ever since I made the Raspberry Cheesecake-Cupcakes, my mother has been buying tons and tons of cream cheese ready for baking whenever I come to her house. A couple weekends ago, she asked me to use the cream cheese to create a decadent dessert for my father’s birthday, and of course, the most decadent cheesecake dessert that I could  think of was tall, rich, gorgeous (kind of sounds like I’m describing a man huh?) New York Style Cheesecake.

This cake is truly as great as people make it out to be. Guests were very much impressed by how delicious it was and most importantly, my dad loved it.

The recipe is from Baking Illustrated, which has never let me down, with a really great cherry-raspberry topping that I think I could have probably eaten plain. This one is definitely a keeper.

New York Cheesecake

Ingredients:

Graham Cracker Crust:
5 Tbsp unsalted butter, melted, plus 1 Tbsp melted unsalted butter for greasing the pan
4 ounces Graham crackers, broken into rough pieces and processed in a food processor to fine, even crumbs (approximately 8.5 crackers)
1 Tbsp sugar

For the filling:
2 1/2 lbs (five 8oz packages) cream cheese cut into rough 1 inch chunks at room temperature
1/8 tsp salt
1 1/2 cups sugar
1/3 cup sour cream
2 tsp lemon juice
2 tsp vanilla extract
2 large egg yolks plus 6 large eggs at room temperature.

Directions:
For the crust: Adjust an oven rack to the lower-middle position and heat the oven to 326 degrees.
brush the bottom and sides of a 9-inch springform pan with 1/2 Tbsp of the melted butter.
Combine the graham cracker crumbs and sugar in a medium bowl.
Add 5 Tbsp of the melted butter and toss with a fork until evenly moistened.
Empty the crumbs into the springform pan and press evenly into the pan bottom using the bottom of a ramekin, 1 cup measuring cup or drinking glass to press the crumbs into the bottom. Use a teaspoon to press the crumbs into the corners of the pan.
Bake until fragrant and beginning to brown around th edges, about 13 minutes.
Cool on a wire rack while making the filling.
For the filling: increase the oven temperature to 500 degrees.
In a standing mixer, beat the cream cheese at medium-low speed to break up and soften it slightly, 1 minute.
Scrape the beater and the bottom and sides of the bowl with a rubber spatula.
Add the salt, half of the sugar and beat at medium-low speed until combined, about 1 minute.
Scrape the bowl once again.
Beat in the remaining sugar until combined (about 1 minute).
Scrape the bowl with the rubber spatula again.
Add the sour cream, lemon juice and vanilla.
Beat at low speed until combined, one minute.
Scrape the bowl.
Add the egg yolks and beat at medium-low speed until thoroughly combined, about one minute. Scrape the bowl.
Add the remaining eggs, two at a time, beating until thoroughly combined, about one minute, scraping the bowl between additions.
Brush the sides of the springform pan with the remaining 1/2 Tbsp melted butter.
Set the springform pan on a rimmed baking sheet to catch any spills.
Pour the filling into the cooled crust and bake 10 minutes.
Without opening the oven door, reduce the oven temperature to 200 degrees and continue to bake until the cheesecake reads about 150 degrees on an instant-read thermometer inserted in the center, about 1 1/2 hours.
Transfer the cake to a wire rake and cool until barely warm, 2 1/2 to 3 hours.
Run a paring knife between the cake and the springform pan sides.
Wrap tightly in plastic wrap and refrigerate until cold, at least three hours. The cheesecake can be refrigerated up to four days.
To unmold, remove the sides of the pan. Slide a thin metal spatula between the crust and the bottom of the pan to loosen, then slide the cake onto a serving plate.
Let the cheesecake stand at room temp 30 minutes, then cut into wedges.

Cherry-Raspberry Topping

Ingredients:
15 ounces mix of frozen cherries and raspberries (this came in two separate bags)
2 tablespoons lemon juice
1/4 cup sugar
2 tablespoons cornstarch
1/2 cup water

Directions:
Place all ingredients together in a medium saucepan. Bring to a boil. Once it is boiling, cook it for an additional one to two minutes then remove from heat. Cool completely before covering cheesecake.

Source: Cheesecake:Baking Illustrated
Cherry/Raspberry Topping adapted from: Smitten Kitchen

Birdseye NY Style Cheesecake

March 10, 2011

Apple Struesel Muffins


Apple Struesel Muffins

This week, I celebrated International Women’s Day (March 8th). I know that to Americans, it’s an unknown holiday, but being born in Europe, my family always celebrates it. My dad actually mentioned to me this year on March 8th, “Can you believe they don’t know what this holiday is here, but 45 minutes away in Canada they’re celebrating it?”

As a part of my Women’s Day ‘celebration’, in addition to emailing a cheesy e-card to all my close girlfriends, I brought in these Apple Struessel Muffins to the hospital and handed them out. They are a perfect mix of sweet and tart (the tart coming from the Granny Smith Apples) and the crumb topping is to die for.

Happy (belated) International Women’s Day!

Apple Struesel Muffins

Ingredients

2 cups all-purpose flour
3 teaspoons baking powder
1 1/4 teaspoons ground cinnamon
1/2 teaspoon baking soda
1 cup sugar
1/2 teaspoon salt
2 eggs
1 cup (8 ounces) sour cream
1/4 cup butter, melted
1 1/2 cups chopped peeled Granny Smith apples

Topping

1/4 cup sugar
3 tablespoons all-purpose flour
1/4 teaspoon ground cinnamon
2 tablespoons cold butter

Directions

Preheat oven to 400 degrees F
In a large bowl, combine dry ingredients. In another bowl, beat the eggs, sour cream and butter. Stir into dry ingredients just until moistened. Fold in apples. Fill greased or paper-lined muffin cups two-thirds full.
For topping, combine sugar, flour and cinnamon. Cut in butter
Bake at 400° for 18-20 minutes or until a toothpick comes out clean. Cool for 5 minutes before removing from pans to wire racks. Serve warm.
Yield: 20 muffins.

Source:
Taste of Home Cooking

February 21, 2011

Strawberry Rhubarb Pie


Strawberry Rhubarb Pie

I usually like to end the week with a sweet post, but given that I was post call last Friday, this post never made it to the Internet. Also, since we’re having round two of Midwest blizzard 2011, I thought a dessert post with fruit was in order to remind us that spring really will be here soon despite what the weather says (the groundhog said spring is coming, and he can’t possibly be mistaken right?).

My husband doesn’t like many desserts…in fact, he likes exactly two desserts: ice cream, and strawberry rhubarb pie. Every year, for his birthday, he asks for strawberry rhubarb pie. Easy request right? Not so much given that we live in the very cold and often snowy North where rhubarb doesn’t exist between November and March. A couple of years ago, my mother-in-law began giving me bags of rhubarb from her garden to freeze in the summer to make her son pie for his birthday, hence this strawberry-rhubarb pie post in February.

This is my tried and true recipe for strawberry rhubarb pie. I have been using it for quite a while and it makes a delicious pie that is not too sweet or too tart. Best of all? It gets the husband seal of approval.

Strawberry Rhubarb Pie

Ingredients

1 deep-dish 9 inch prepared pie crust (1/2 recipe of this basic pie dough)
4 cups (about 1 1/4 pounds) rhubarb, ends trimmed, cut crosswise into 1/2 inch piece
2 cups strawberries, quartered
1 cup sugar
2 tablespoons cornstarch
1/8 tsp salt

Crumble Topping

3/4 cup all-purpose flour
1/3 cup packed brown sugar
3 tablespoons granulated sugar
1 teaspoon cinnamon
1/8 teaspoon of salt
6 tablespoons cold unsalted butter, cut into small pieces

Directions

For the crumble topping – in a medium bowl, mix the flour, brown sugar, granulated sugar, cinnamon, and salt. Work in the butter with your hands, until large moist clumps form. Cover and chill until ready to use.
Preheat oven to 400 degrees with rack in lowest level. In a large bowl, toss rhubarb and strawberries with sugar, cornstarch, and salt. Pour into pie shell; sprinkle with Crumble Topping. Place pie on a foil-lined rimmed baking sheet.
Place pie in oven; reduce heat to 375 degrees. Bake until topping is browned and crust is lightly browned, about 1 1/2 hours. (If topping or crust begins to brown too quickly, cover with foil.) Cool completely before serving.

Sources: Adapted from: Very Culinary and Baking Illustrated

February 14, 2011

Iced Raspberry Souffle


Iced Raspberry Souffle

Happy Valentine’s Day!

Still looking for the perfect dessert for your sweetheart for tonight? Well, this souffle is tres’ chic and definitely hits the spot (and its so  light as well). I first saw this recipe during my ‘Take Home Chef’ phase…I’d watch every episode of that show on TLC and hope to run into that chef in my local grocery store…yeah, okay, I don’t think he ever came out to the midwest, but a girl can dream. The premise of that show was basically, this  awesome chef would pick some random person in a grocery store and pay for all their groceries and then come home with them and teach them to cook a fantastic meal. Pretty amazing.

Well, on one show, he made this iced raspberry souffle as the dessert, and I knew I just had to make it. It’s been my go-to Valentine’s Day dessert for the last several years because my husband absolutely loves it, and it’s really quite simple to make. The only problem I have with it is that raspberries are sometimes hit or miss at the grocery store here this time of year.

Anyways, enjoy and have a wonderful Valentine’s Day!

Iced Raspberry  Souffle

Ingredients

6 ounces fresh raspberries
3/4 cup  sugar
1 cup heavy whipping cream, semi-whipped
2 large egg whites
2 tablespoons powdered sugar
4 fresh raspberries, for garnish
Additional powdered sugar, for garnish

Directions

Cut four 14×3-inch/35×8-cm pieces of parchment paper. Wrap 1 paper strip around each of four 3/4-cup/175-ml soufflé dishes, forming collars that extend 1 inch/2.5 cm above the rims. Tape the ends to secure. Blitz the 6 ounces/170 g of raspberries and sugar in a blender until a puree forms.
Strain the puree through a fine-meshed sieve and into a large bowl, discarding the seeds in the strainer. Using a large rubber spatula, gently fold the semi-whipped cream into the raspberry puree.
In a separate large bowl, use an electric mixer to beat the egg whites and 2 tablespoons/20 g of powdered sugar until stiff peaks form. Gently fold the egg whites into the raspberry-cream mixture.
Pour the mixture into the soufflé dishes, dividing equally. Freeze for 3 hours or just until the raspberry mixture is frozen. Gently remove the parchment paper from the soufflés. Top each with a raspberry. Dust lightly with powdered sugar and serve!

Source: Take Home Chef

February 5, 2011

Raspberry Cheesecake Cupcakes


Raspberry Cheesecake Cupcakes

I’m pretty sure that unless a person is lactose intolerant, there is absolutely no way for them to dislike cheesecake. So when my mother approached me the other day to make a dessert for her to take to work for a coworker’s birthday, I immediately thought of cheesecake cupcakes. Of course, Valentine’s Day is on my mind already so I couldn’t just make plain old cheesecake cupcakes, so I searched for a way to make them more festive, and stumbled upon Annie’s version of them that involved swirling raspberries into the top layer of them to create a beautiful finished marbled appearance.

After my mother called me the next day telling me that the cupcakes got rave reviews at work, I knew I had to bring them into work myself. Now, I have this rule about call nights. I always bring in baked goods when I’m on call. It makes call so much more pleasant for both myself (because seriously, who doesn’t want to be eating cheesecake on call between ICU admissions) and for the residents who are on with me.

Now, I usually don’t post blog entries on the weekends, but this post is for my mother….because her coworkers have been tirelessly asking her to bring the cheesecake cupcakes to work again. So here you go mom! Enjoy making these this weekend!

Raspberry Cheesecake Cupcakes

Ingredients

For the crust:
9 Honey Graham crackers
4 Tbsp unsalted butter, melted

For the filling:
16 oz cream cheese, softened
2 eggs
2 tsp vanilla
1/2 cup sugar

For the topping:
6 oz raspberries
2 Tbsp Sugar

Directions:

Preheat oven to 375° F. Line 12 cups of a mini muffin tin with paper liners.
For the crust, break the cinnamon graham crackers into chunks and pulse them in a food processor until they are fine crumbs.
With the crumbs in the food processor, pulse while slowly pouring in the melted butter until combined and resembling wet sand. Divide the crumbs between 12 cups of the prepared mini muffin tin, pressing the crumbs into the bottom and a little bit up the sides to form the crust. Set aside.
For the filling, beat softened cream cheese and egg in a medium bowl or in the bowl of a stand electric mixer until smooth and thoroughly combined.
Add vanilla and sugar, and continue beating until combined. Spoon the filling into each mini muffin cup, filling almost to the top.
To make the raspberry puree, combine the raspberries and sugar in a blender or food processor. Process until smooth, then pour through a fine mesh sieve to remove the seeds.
Dot a ½ teaspoon of the raspberry puree in a few dots over the cheesecake filling. Use a toothpick or a wooden skewer to lightly swirl and create a marbled effect.
Bake for 15 minutes, until the tops are no longer glossy and the centers are set.
Remove the cheesecakes from the pan and set on a wire rack to allow the cheesecakes to cool about 30 minutes at room temperature.
After 30 minutes, continue cooling the cheesecakes in the refrigerator for at least 1 hour.
Once cool, store cheesecakes in the refrigerator in an airtight container until ready to serve.

Sources: Adapted from: Craving Chronicles and Annie’s Eats

My mother's food styling of Cheesecake Cupcakes

January 26, 2011

Cranberry and Blueberry Mini-Muffins


Cranberry and Bluebery Mini-Muffins

I have to start off by saying, these are my absolute favorite  go-to muffins.

I don’t think I’ve ever run into a person that has not enjoyed these…and I’ve been making these for years so I have a pretty large sample size. They’re soft and delicious and practically melt in your mouth…and the crumb topping…there aren’t even words for it.

I usually make these with just blueberries and full-size, but it being winter and having made these for a baby shower, I made mini-muffins and included cranberries and you know what? They tasted just as good with cranberries…and the fact that they were mini just meant that I could eat twice as many of them.

Cranberry and Blueberry Mini-Muffins

Ingredients

1 1/2 cups all-purpose flour
3/4 cup white sugar
1/2 teaspoon salt
2 teaspoons baking powder
1/3 cup vegetable oil
1 egg
1/3 cup milk
1/2 cup fresh blueberries
1/2 cup fresh cranberries

For the crumb topping
1/2 cup white sugar
1/3 cup all-purpose flour
1/4 cup butter, cubed
1 1/2 teaspoons ground cinnamon

Directions

Preheat oven to 400 degrees F. Grease muffin cups or line with muffin liners.
Combine 1 1/2 cups flour, 3/4 cup sugar, salt and baking powder.
Place vegetable oil into a 1 cup measuring cup; add the egg and enough milk to fill the cup. Mix this with flour mixture.
Divide batter evenly into two mixing bowls.
Fold in blueberries into one bowl and cranberries into the other bowl.
Fill muffin cups right to the top, and sprinkle with crumb topping mixture.

To Make Crumb Topping:
Mix together 1/2 cup sugar, 1/3 cup flour, 1/4 cup butter, and 1 1/2 teaspoons cinnamon. Mix with fork, and sprinkle over muffins before baking.
Bake for 20 to 25 minutes in the preheated oven, or until done.

Source: Adapted from: AllRecipes