Archive for April, 2011

April 27, 2011

Recipe Swap – Asian Grilled Salmon with Coconut Rice

Asian Grilled Salmon and Coconut Rice

Recently, I’ve been trying to get more involved in the ‘cooking community’. Part of this has been cooking more with friends. Part of it has been starting a food blog. Most recently, I ventured out and decided to be a part of a recipe swap hosted by A Taste of Home Cooking Blog. The idea of this is simple; submit an Asian  recipe  and  get assigned one in return to cook and review / blog about.

My husband went to high school in Japan, so coming up with a recipe for me to recommend  was easy, I sent out his favorite Kung Pao Chicken. The ‘recipe’ I got in return, was actually a full meal from Nicole at Baby Food Scoops! The meal included Asian Grilled Salmon, Coconut Rice and Sauteed Snap Peas. Being  that I was in a bit of a hurry the night I made this, and that my husband isn’t really a fan of snap peas, I made the salmon and  rice without the peas (but will still post the snap peas recipe for anyone who is interested).

Review: My husband really liked the salmon. He thought that the marinade was great! Definitely a keeper! We love grilling in the summertime, so we will definitely make this again. The rice, my husband isn’t a huge fan  of coconut, so I knew he’s be a bit apprehensive about this…that and he isn’t a hue fan of anything that isn’t made in his Japaneese Rice Cooker. My mother however LOVED the rice. She actually got the recipe from me so that she could make it again.

Asian Grilled Salmon

Asian Grilled Salmon

Ingredients:
1/4 cup packed brown sugar
1/4 cup soy sauce
3 tbsp unsweetened pineapple juice
3 tbsp red wine vinegar
3 garlic cloves, minced (I used 4…we like garlic in this household…)
1 tbsp lemon juice
1 tsp ground ginger
1/2 tsp pepper
1/2 tsp hot pepper sauce (I used a full tsp)
1 salmon fillet (2 pounds)

Directions:

In small bowl, combine the first nine ingredients.
Pour 3/4 cup into large resealable bag; add salmon.
Seal bag and turn to coat. Refrigerate at least 1 hour, turning occasionally.
Set aside remaining marinade for basting. Create a ‘pan’ for salmon with a sheet of aluminum foil. Drain and discard marinade.
Place salmon skin-side-down on aluminum foil. Grill, covered, over medium heat for 5 minutes. Brush with reserved marinade. Grill 15-20 minutes longer or until fish flakes easily with a fork.

Coconut Rice

Coconut Rice

Ingredients:
2 cups Thai jasmine-scented rice
2 cups good-quality coconut milk, not fat-free (or 3 tbsp cream of coconut + milk to equal 1 cup)
1 3/4 cups water
1/2 tsp. salt
1/2 tsp. canola oil
Optional Garnish: 2 Tbsp. dry shredded coconut

Directions:
Rub oil over the bottom of a deep-sided pot. (Note: the pot will need a tight-fitting lid).
Place rice, coconut milk, water, and salt in the pot. Place pot on the stove over medium to high heat. Stir well.
Continue to stir occasionally until the coconut milk & water come to a bubbling boil (stirring will keep the rice from sticking to the bottom of the pot and burning).
Once the rice has begun to bubble, stop stirring. Turn down the heat to medium-low. Place lid askew on the pot, so that it is at least 3/4 covered.
Allow to simmer in this way for 10 minutes, or until rice has absorbed most of the coconut-water.
Now turn off the heat, but leave the pot on the burner. Cover the pot tightly with the lid and allow to sit 5-10 minutes, or until the rest of your dinner is ready (the rice will “steam” and be nice and sticky).
When ready to eat, remove the lid and “fluff” rice with a fork or chopsticks, gently loosening it in the pot.
Optional Step: “dry fry” 2 Tbsp. shredded coconut in a (dry) frying pan over medium heat, stirring continually until the coconut turns golden-brown. Sprinkle this toasted coconut over the rice for an extra coconutty treat. (I skipped this step since due to the whole ‘coconut issue’ with husband)

Sauteed Snap Peas

Ingredients:
1 pound sugar snap peas, rinsed
1-2 tbsp sesame oil
1-2 tbsp sesame seeds
1 tsp coarse sea salt

Directions:
Heat oil in large skillet. Add peas and sea salt to skillet and stir fry 10-15 minutes. Toss with sesame seeds and serve warm.

Source: Adapted from: Baby Food Scoops

April 25, 2011

Flourless Chocolate Cake

Flourless Chocolate Cake

I know Passover is almost over, but I just had to end it with a something absolutely delicious, and this cake is definitely that. It’s rich and has almost a fudge-like quality.

Almost every year, Easter falls during Passover, which wouldn’t be such a big deal except that my husband’s family always has a big Easter party with amazing food and amazing desserts…most of which I can’t eat. This year, I decided to allow myself to indulge in some of the celebration by making this flourless chocolate cake. With only three ingredients, it was a breeze to make and great for someone (like me) whose kitchen is mostly packed up in boxes (did I mention we’re moving into our first house in 2 weeks?).


Flourless Chocolate Cake

Ingredients
8 large eggs, cold
1 lb. semisweet (or bittersweet) chocolate, coarsely chopped
16 Tbsp. (2 sticks) unsalted butter, cut into 16 pieces
Optional toppings: Confectioners sugar and/or berries

Directions:

Adjust an oven rack to the lower-middle position and heat the oven to 325 degrees.
Line the bottom of an 8-inch springform pan with parchment paper or waxed paper and grease the sides of
the pan. (Be sure to grease the sides really well!)
Wrap the outside of the pan with 2 sheets of heavy-duty aluminum foil and set it in a large roasting pan. Bring a kettle or pot of water to boil.
In a stand mixer using the whisk attachment, beat the eggs at high speed until the volume doubles (5-10 minutes).
Meanwhile, melt the chocolate and butter together in a heatproof bowl over a simmering pot of water until the chocolate reads 115 degrees on an instant-read thermometer – stirring occasionally.
Fold about a third of the beaten eggs into the chocolate mixture using a large rubber spatula until only a few streaks of egg are visible.
Fold in half of the remaining egg foam, and then the last half of the foam, until the mixture is totally homogenous.
Scrape the batter into the prepared springform pan and smooth the surface with a rubber spatula. Place the roasting pan on the oven rack and pour in enough boiling water to come about halfway up the sides of the springform pan. Bake until the cake has risen slightly, the edges are just beginning to set, a thin-glazed crust has formed on the surface, and an instant-read thermometer inserted halfway into the center reads 140° F, 22-25 minutes.
Remove the springform pan from the water bath and set on a wire rack; cool to room temperature. Cover and refrigerate overnight to mellow and firm. (The cake can be refrigerated for up to 4 days.)
About 30 minutes prior to serving, carefully remove the sides of the springform pan, invert the cake onto a sheet of waxed paper, peel off the parchment paper, and reinvert the cake onto a serving platter.
Lightly dust the cake with powdered sugar and top with berries. To slice, use a sharp, thin-bladed knife, dipping the knife into a pitcher of hot water and wiping the blade before each cut.

Source: Gimme Some Oven! , Originally from Cooks Illustrated

April 22, 2011

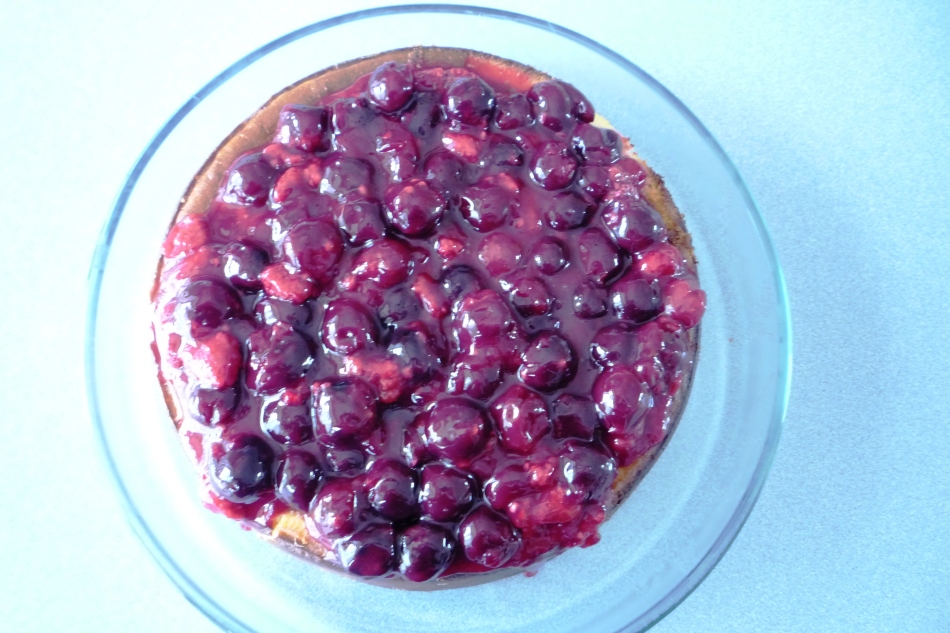
New York Cheesecake with Cherry-Raspberry Topping

New York Style Cheesecake

Don’t let the bad photography skills fool you. This cake is truly amazing. Ever since I made the Raspberry Cheesecake-Cupcakes, my mother has been buying tons and tons of cream cheese ready for baking whenever I come to her house. A couple weekends ago, she asked me to use the cream cheese to create a decadent dessert for my father’s birthday, and of course, the most decadent cheesecake dessert that I could  think of was tall, rich, gorgeous (kind of sounds like I’m describing a man huh?) New York Style Cheesecake.

This cake is truly as great as people make it out to be. Guests were very much impressed by how delicious it was and most importantly, my dad loved it.

The recipe is from Baking Illustrated, which has never let me down, with a really great cherry-raspberry topping that I think I could have probably eaten plain. This one is definitely a keeper.

New York Cheesecake

Ingredients:

Graham Cracker Crust:
5 Tbsp unsalted butter, melted, plus 1 Tbsp melted unsalted butter for greasing the pan
4 ounces Graham crackers, broken into rough pieces and processed in a food processor to fine, even crumbs (approximately 8.5 crackers)
1 Tbsp sugar

For the filling:
2 1/2 lbs (five 8oz packages) cream cheese cut into rough 1 inch chunks at room temperature
1/8 tsp salt
1 1/2 cups sugar
1/3 cup sour cream
2 tsp lemon juice
2 tsp vanilla extract
2 large egg yolks plus 6 large eggs at room temperature.

Directions:
For the crust: Adjust an oven rack to the lower-middle position and heat the oven to 326 degrees.
brush the bottom and sides of a 9-inch springform pan with 1/2 Tbsp of the melted butter.
Combine the graham cracker crumbs and sugar in a medium bowl.
Add 5 Tbsp of the melted butter and toss with a fork until evenly moistened.
Empty the crumbs into the springform pan and press evenly into the pan bottom using the bottom of a ramekin, 1 cup measuring cup or drinking glass to press the crumbs into the bottom. Use a teaspoon to press the crumbs into the corners of the pan.
Bake until fragrant and beginning to brown around th edges, about 13 minutes.
Cool on a wire rack while making the filling.
For the filling: increase the oven temperature to 500 degrees.
In a standing mixer, beat the cream cheese at medium-low speed to break up and soften it slightly, 1 minute.
Scrape the beater and the bottom and sides of the bowl with a rubber spatula.
Add the salt, half of the sugar and beat at medium-low speed until combined, about 1 minute.
Scrape the bowl once again.
Beat in the remaining sugar until combined (about 1 minute).
Scrape the bowl with the rubber spatula again.
Add the sour cream, lemon juice and vanilla.
Beat at low speed until combined, one minute.
Scrape the bowl.
Add the egg yolks and beat at medium-low speed until thoroughly combined, about one minute. Scrape the bowl.
Add the remaining eggs, two at a time, beating until thoroughly combined, about one minute, scraping the bowl between additions.
Brush the sides of the springform pan with the remaining 1/2 Tbsp melted butter.
Set the springform pan on a rimmed baking sheet to catch any spills.
Pour the filling into the cooled crust and bake 10 minutes.
Without opening the oven door, reduce the oven temperature to 200 degrees and continue to bake until the cheesecake reads about 150 degrees on an instant-read thermometer inserted in the center, about 1 1/2 hours.
Transfer the cake to a wire rake and cool until barely warm, 2 1/2 to 3 hours.
Run a paring knife between the cake and the springform pan sides.
Wrap tightly in plastic wrap and refrigerate until cold, at least three hours. The cheesecake can be refrigerated up to four days.
To unmold, remove the sides of the pan. Slide a thin metal spatula between the crust and the bottom of the pan to loosen, then slide the cake onto a serving plate.
Let the cheesecake stand at room temp 30 minutes, then cut into wedges.

Cherry-Raspberry Topping

Ingredients:
15 ounces mix of frozen cherries and raspberries (this came in two separate bags)
2 tablespoons lemon juice
1/4 cup sugar
2 tablespoons cornstarch
1/2 cup water

Directions:
Place all ingredients together in a medium saucepan. Bring to a boil. Once it is boiling, cook it for an additional one to two minutes then remove from heat. Cool completely before covering cheesecake.

Source: Cheesecake:Baking Illustrated
Cherry/Raspberry Topping adapted from: Smitten Kitchen

Birdseye NY Style Cheesecake

April 20, 2011

Panzanella

Panzanella

It’s cold. It’s rainy. It doesn’t feel like spring at all. Welcome to the Midwest. On weeks like these, I turn up the thermostat to 80, put on shorts, turn up the reggae  and dance around my house while cooking up something summery and pretending it’s sunny and beautiful outside. During one particular occasion, I decided to be ‘Italian’ and make a beautiful Panzanella. This light summery salad is a perfect way to forget a cold rainy day. The thing I love most about it is that it’s different. It’s not your typical ‘lettuce and tomato’ salad (though there’s nothing wrong with typical salads when you’re craving them), and the  fact that it has the toasted bread makes it able to be a meal all in itself. This salad is definitely a keeper in my salad repertoire.

Panzanella

Ingredients

3 tablespoons good olive oil
1 small French bread, cut into 1-inch cubes (6 cups)
1 teaspoon kosher salt
2 large ripe tomatoes, cut into 1-inch cubes
1 hothouse cucumber, unpeeled, seeded, and sliced 1/2 inch thick
2 bell peppers, seeded and cut into 1-inch cubes (I like to use a combination of purple or yellow or orange, to nicely colorize the dish)
20 large basil leaves, coarsely chopped
3 tablespoons capers, drained

For the vinaigrette


1 teaspoon finely minced garlic
1/2 teaspoon Dijon mustard
3 tablespoons champagne vinegar
1/3 cup good olive oil
1/2 teaspoon kosher salt
1/4 teaspoon freshly ground black pepper

Directions:
Heat the oil in a large saute pan. Add the bread and salt; cook over low to medium heat, tossing frequently, for 10 minutes, or until nicely browned. Add more oil as needed.
For the vinaigrette, whisk together the ingredients.
In a large bowl, mix the tomatoes, cucumber, red pepper, yellow pepper, red onion, basil, and capers. Add the bread cubes and toss with the vinaigrette. Season liberally with salt and pepper.
Serve immediately, or allow the salad to sit for about half an hour for the flavors to blend.

Source: Adapted from: Smitten Kitchen

April 11, 2011

Chicken Ghiveci


Chicken Ghivich

People often ask me what “Moldovian food” is. This is a pretty difficult question to answer since I’ve figured out that it is truly a mishmash of Romanian, Ukranian and Russian food. Growing up, my family would often get together for meals and I always assumed that what we were eating was just “Moldovian food”. As I’ve gotten older, I’ve figured out that so much of what I eat is actually Romanian or  Ukranian. I usually make a list for people that includes “chicken jello” (trust me, you don’t want to know…its actual name is Halodets), “Olivier salad” (the Eastern European version of potato salad), and “pirozhki” (post on these will happen very soon as they are one of my favorite foods in the world).

Ghiveci is usually on this list as well. This ‘chicken ghiveci’ is a Romanian dish that I absolutely love. It can be made vegetarian just by excluding the chicken (and still tastes great). It’s a very good dish for cleaning out your refrigerator as you can throw pretty much any vegetable into it. Warm and very similar to a vegetable/chicken stew, for me, this is truly comfort food.

Chicken Ghiveci

Ingredients
1/4 cup vegetable oil
1 mild onion, thinly sliced
2 garlic cloves, crushed
2 red bell peppers, seeded and sliced
1 1/2 lbs chicken breast
6 Tbsp tomato paste
3 potatoes, diced
1/2 tsp dried rosemary
1/2 tsp dried marjoram
1/2 tsp dried thyme
3 carrots, cut into chunks
1/2 small celeriac, cut into chunks
1/2 cup dry white wine
2 zucchini sliced
salt and black pepper

Directions

Heath the oil in a large flameproof casserole. Add the onion and garlic andcook for 1-2 minutes, until soft.
Add the chopped red peppers
Cut the chicken into 1-2 inch cube, place in the casserole and brown on all sides.
after 15 minutes, add the tomato paste, potatoes, herbs, carrots, celeriac and white wine and season to taste with salt and pepper.
Cook over low heat, covered for another 40-50 min.
Add zucchini slices 5 min before end of cooking. Adjust the seasoning to taste.
Serve with dark rye bred.

Source: Adapted from: Russian, German & Polish Food & Cooking

April 4, 2011

Teddy Bear Cupcakes for a Teddy Bear Picnic


Teddy Bear Cupcakes

I know I’ve been on a bit of a hiatus, but honestly, it hasn’t been without good reason. We’ve had some major life-changing events in the past few weeks that have kept me pretty busy.

A short summary of the past few weeks for us:

– I ‘matched’ into a surgical residency position. This basically means that I got my first job! I know that I’ll have to work harder than I ever have in my life, but the way I look at it is that I’ll be doing exactly what I want to be doing (surgery)…I’ll just be doing a whole lot of it. So I’m thrilled to start this new stage in my medical education.

-My husband graduated from his MBA program in the top 20 percent of his class. For the past two years, he’s been working full time and doing a weekend MBA program and I am extremely proud of him for graduating and doing so well.

-We started looking for a home. This was so exciting at first, but it’s been a bit of a roller coaster. We lost one home to another offer and are now in a bidding war on another home. Maybe it’s some sort of first-time-home-buyers curse? Anyways, I’m hoping it works out.

So as you see, it’s been busy, but hopefully things will slow down a bit and I can actually update it now since I have lots of great recipes waiting to be posted.

These cupcakes were made together with my good friend and great baking buddy Bree (who I know I’ve mentioned several times in this blog). Her daughter turned one last weekend and since her nickname is Brynne Bear, Bree thought that it was most appropriate to throw her a teddy bear picnic. She actually found this recipe in the Jewish Chronicle Online (a bit random) but these were  so adorable a cinch to make. For the base cupcake, we used my favorite Hershey’s Perfectly Chocolate Cake batter…always a winner.The frosting wasn’t overly sweet, which was a perfect contrast to the cupcakes. The only catch with the frosting is that the directions were in grams and while this was not a problem for me (since I recently purchased a kitchen scale to make macarons with), I know that many people do not own a scale. Bree and I were having a bit too much fun baking, chatting and sipping wine that I didn’t think to count how much chocolate and butter 75 grams is, but I will definitely take note of this next time.  And the decorations? Well, I think they speak for themselves. Bree reported back that everyone was very impressed, especially the birthday girl.

Happy Birthday Brynne!

Teddy Bear Chocolate Cupcakes

For the cupcakes

Ingredients

2 cups sugar
1 3/4 cups all purpose flour
3/4 cups Hershey’s Cocoa
1 1/2 tsp baking powder
1 1/2 tsp baking soda
1 tsp salt
2 eggs
1 cup milk
1/2 cup vegetable oil
2 tsp vanilla extract
1 cup boiling water

Directions:
Preheat oven to 350 degrees. Line cupcake tins with liners.
Stir together sugar, flour, cocoa, baking powder, baking soda and salt in large bowl. Add eggs, milk, oil and vanilla; beat on medium speed of mixer 2 minutes.
Stir in boiling water (batter will be thin). Fill cups 2/3 full with batter. Bake 22 to 25 minutes. Cool completely. Frost.

For the frosting:

Ingredients:

75g semisweet baking chocolate
75g butter
2 tsp powdered sugar
pinch of salt

Directions:

Melt the chocolate in a heatproof bowl over a pan of warm water, then allow to cool for five minutes.
Beat the butter and sugar together with a pinch of salt, then beat in the cooled chocolate.
The icing will be very soft, so refrigerate for 20-30 minutes, stirring halfway through until firmer, but spreadable. Swirl the buttercream over the cakes using a palette knife.

For the decorations:

Ingredients:

Ready to roll white icing
Chocolate buttons
Chocolate M&Ms
Black writing icing

Directions:

Make small balls of white icing and flatten into oval shapes.
Place in the center of each cupcake and attach and M&M for the nose using a little of the writing icing.
Draw on a mouth using a tube of black writing icing and add chocolate buttons for ears and M&Ms for eyes.

Source: Hershey’s Perfectly Chocolate Cake , The Jewish Chronicle Online